
Key Takeaways
- Jelly blushes differ from creams by utilizing water-based gelling agents for a sheer, cooling application.
- Speed is critical: The rapid dry-down time of stains requires immediate blending to prevent distinct ‘polka dots’.
- The ‘W’ placement technique creates the most authentic sun-kissed, youthful appearance.
- Synthetic bristles or fingers are superior to natural hair brushes for handling gelatinous textures without absorption.
- Layering jelly tints under powder blush significantly extends wear time up to 16 hours.
- Skin prep determines finish: Hydrated, silicone-free bases prevent the jelly from pilling or separating.
- Cool-toned berry jellies neutralize sallowness in olive skin tones better than traditional warm corals.
You’ve seen the viral videos: a bouncy, gelatinous stick glides over a cheek, leaving behind an impossibly dewy, watercolor-like stain. It looks effortless. Yet, when you try it at home, the result is often a patchy mess, stained fingertips, or a flush that disappears in an hour. The problem? treating jelly blush tints like traditional cream or powder blushes. These water-based innovators behave differently on a molecular level. The solution? A revamped application strategy. In this comprehensive guide, we break down the chemistry, the timing, and the placement hacks necessary to master the jelly texture. Here is how to achieve that coveted glass skin finish without the frustration.
1. Understanding the Chemistry: Jelly vs. Cream vs. Stain
Jelly blush tints occupy a unique space in cosmetic chemistry. Unlike cream blushes, which rely on waxes and oils (emollients) to sit on top of the skin, jelly tints are primarily water-based with gelling agents like agar, carrageenan, or sodium stearate. This composition allows them to melt upon contact and stain the epidermis rather than just coating it.
Key Composition Differences
| Feature | Jelly Tint | Cream Blush | Powder Blush |
|---|---|---|---|
| Base | Water/Gel | Oil/Wax | Talc/Mica |
| Finish | Translucent/Glass | Dewy/Satin | Matte/Shimmer |
| Dry Down | Rapid/Stain | Slow/Movable | Instant/Dry |
| Wear Time | 8-12 Hours | 4-6 Hours | 6-8 Hours |
The ‘cooling’ effect often cited in marketing is real—it is the sensation of water evaporating as the pigment binds to the keratin in your skin. Understanding this rapid evaporation rate is crucial because it dictates your working time. You cannot dot it on and wait; you must blend immediately.

2. Essential Skin Prep: The Hydration Foundation
Because jelly tints are water-based, they adhere best to hydrated skin. If your skin is dry or flaky, the pigment will cling to dead skin cells, creating dark, uneven patches. Conversely, if your skin is too oily or coated in heavy silicones, the water-based tint may repel, leading to separation.
The Golden Rule of Prep:
1. Exfoliate: Use a mild chemical exfoliant (AHA/BHA) the night before to ensure a smooth canvas.
2. Hydrate: Apply a lightweight, glycerin-based moisturizer. Glycerin is a humectant that bonds well with jelly textures.
3. Wait: Let your skincare fully absorb (3-5 minutes). The skin should feel tacky, not wet.
4. Avoid: Heavy occlusives or dimethicone-heavy primers immediately before application, as these create a barrier the stain cannot penetrate.

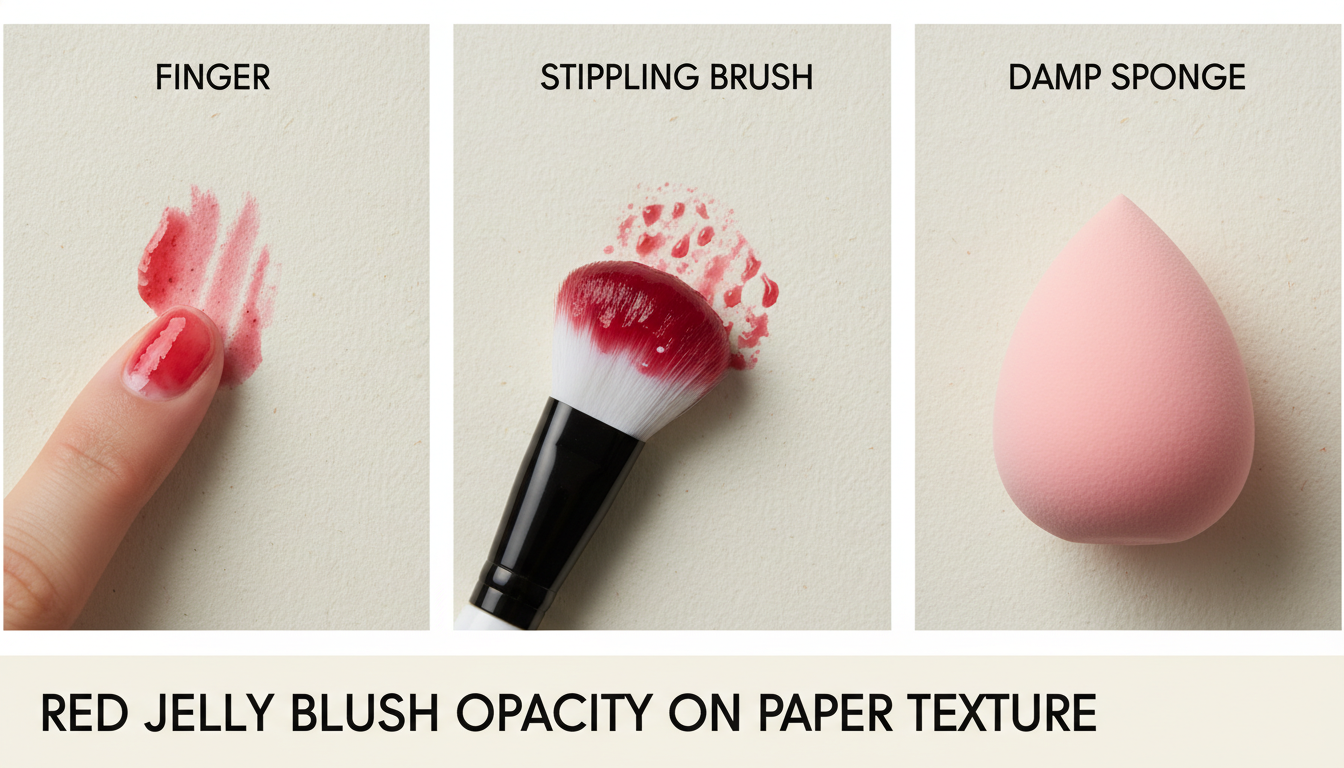
3. Choosing Your Tool: Fingers, Brush, or Sponge?
The tool you use changes the opacity and finish of jelly tints dramatically.
1. Fingers (Highest Payoff): The warmth of your fingertips helps melt the gel, making it easier to spread. However, jelly tints stain skin quickly, so be prepared for stained fingertips. This method yields the most pigmented, ‘glass skin’ finish.
2. Synthetic Brush (Controlled Precision): Use a dense, synthetic stippling brush. Do not use natural hair brushes, as they will absorb the water content and waste product. A synthetic brush allows you to buff the product into the skin for an airbrushed look.
3. Damp Sponge (Sheerest Finish): A damp beauty sponge adds moisture, shearing out the pigment significantly. This is ideal for beginners afraid of over-applying, though it may reduce the longevity of the stain.
4. The ‘W’ Placement: Sun-Kissed Realism
The ‘W’ placement mimics where the sun naturally hits the face, creating a youthful, vacation-fresh look. Jelly tints are superior for this technique because their translucency looks like a natural flush rather than makeup sitting on the skin.
Step-by-Step Execution:
1. Start at the outer corner of one cheekbone.
2. Sweep the product across the apple of the cheek.
3. Continue the line across the bridge of the nose.
4. Mirror the movement on the other cheek.
Pro Tip: Keep the placement high. Dragging the ‘W’ too low can drag the face down. The lowest point should not dip below the nostril line. Blend edges rapidly to avoid harsh lines.

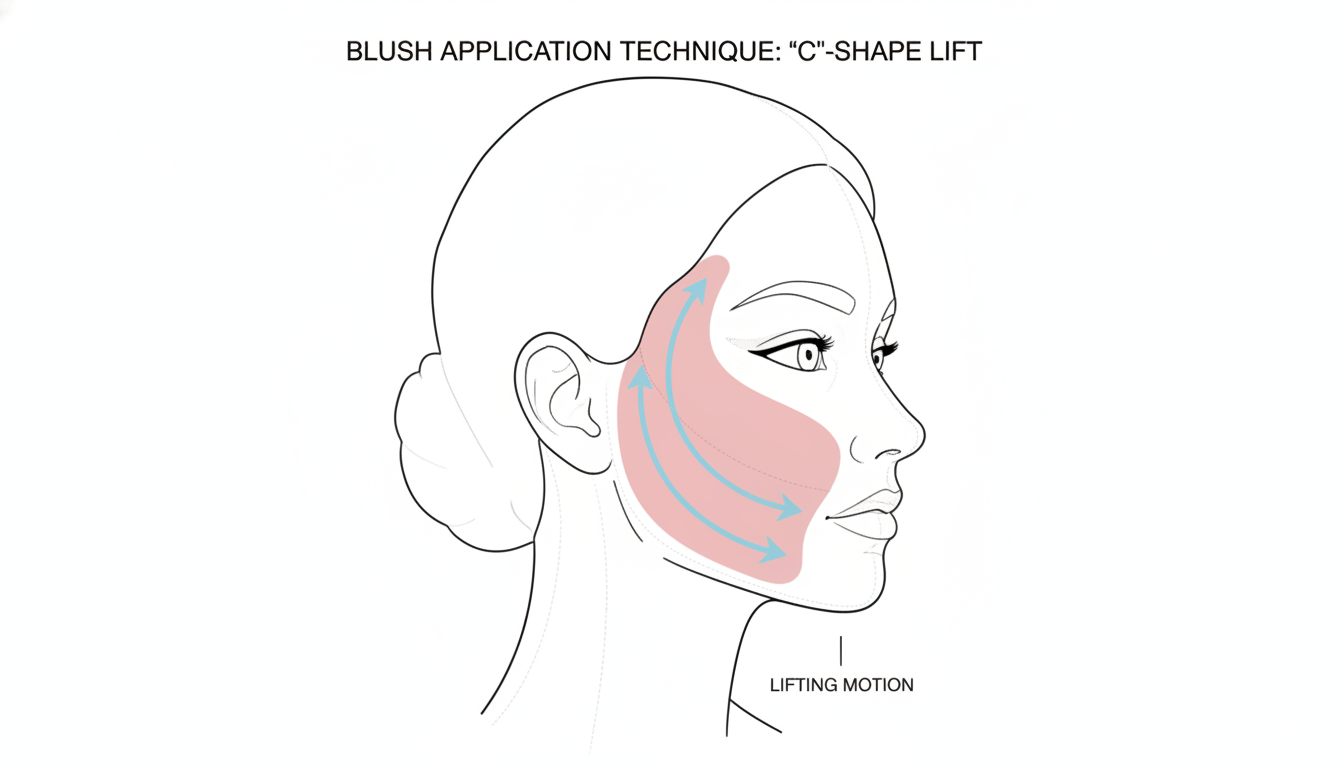
5. The ‘C’ Drape: Instant Face Lift
For a more sculpted, editorial look, the ‘C’ shape draping technique lifts the features. This method focuses pigment on the high points of the face, integrating blush with highlighter zones.
Technique:
- Start at the temple (near the eyebrow tail).
- Curve the application down around the orbital bone to the top of the cheekbone.
- Blend upwards into the hairline.
This placement draws the eye upward, creating a lifting effect. Jelly tints work beautifully here because they don’t emphasize fine lines around the eyes like powders can. Use a darker berry shade for a dramatic evening look or a light coral for subtle day lifting.
6. The ‘Cold Girl’ Flush: Nose & Center Focus
The viral ‘Cold Girl’ aesthetic relies on looking like you’ve just come in from a winter walk. Jelly tints are the only product that can authentically replicate this because they simulate increased blood flow.
Focus Areas:
- Tip of the Nose: Apply a concentrated dot here and blend circular motions.
- Cupid’s Bow: A tiny amount above the lip adds definition and innocence.
- Center Cheeks: Keep the blush concentrated on the very front of the apples, not sweeping back.
Warning: Use cooler toned pinks or berry shades for this. Warm oranges or browns will not achieve the ‘chilled’ effect.

7. Color Theory: Picking the Right Shade
Jelly tints are sheer, meaning your natural skin tone will show through and influence the final color. This is subtractive color mixing.
- Fair/Light Skin: Opt for soft pinks, lilacs, or peaches. High-pigment reds can look like a rash if not sheered out.
- Medium/Olive Skin: Avoid cool pastels that can look chalky. Go for warm corals, brick reds, or true roses.
- Deep/Dark Skin: You have the versatility to wear the boldest pigments. Deep berries, bright fuchsias, and vibrant oranges pop incredibly well against melanin-rich skin. Unlike white-based cream blushes, jelly tints won’t leave an ashy cast.

8. Speed Blending: Avoiding the Polka Dot Effect
The number one complaint with jelly blushes is the ‘polka dot’ stain—where the product dries in the shape of the applicator before it can be blended.
The Fix:
1. Never apply directly to the face: This is the amateur mistake.
2. Back of Hand Method: Swipe the stick or applicator onto the back of your hand first to warm up the formula.
3. Pickup & Apply: Pick up the product from your hand using your brush or sponge, then apply to the face. This ensures an even distribution of pigment and eliminates the risk of geometric stains on your cheeks.

9. Layering for Longevity (The Sandwich Method)
If you need your blush to last through a 16-hour day or a sweaty gym session, use the Sandwich Method. Jelly tints act as the perfect primer for powder products.
The Layering Protocol:
1. Base: Apply your jelly tint on bare skin or over liquid foundation.
2. Set: Lightly dust a translucent setting powder to lock the moisture.
3. Top: Apply a matching powder blush over the jelly.
The jelly tint stains the skin, providing a backup color that remains even if the powder on top fades. This technique creates a multidimensional, lit-from-within glow that is bulletproof.

10. Dual-Use: The Jelly Lip Stain
Most jelly cheek tints are formulated to be lip-safe. Using the same shade on lips and cheeks creates a cohesive, high-fashion monochrome look.
Lip Application Tips:
- Gradient Lip: Apply product only to the center of the lips and press them together for a Korean-style gradient.
- Full Pout: Line lips with a nude pencil first, then fill in with the jelly tint. Top with a clear gloss for a ‘tanghulu’ (candied fruit) finish.
- Note on Taste: Some jelly tints have a bitter taste due to the gelling agents. Check reviews or product descriptions if you are sensitive to flavors.

11. Troubleshooting: Dealing with Patchiness
Even with the best prep, mistakes happen. If you’ve applied too much or the blend is patchy, do not wipe it—you will only ruin your base makeup.
Emergency Fixes:
- The Foundation Buffer: Take your foundation brush (with leftover product on it) and buff over the edges of the blush. This pushes the blush back ‘under’ the skin layer.
- The Mist: Spray a hydrating face mist. The water reactivates the outer layer of the jelly slightly, giving you a few more seconds of pliability to blend.
- The Oil: If it is truly disastrous, a tiny dot of face oil can break down the pigment, but be warned: this will remove your foundation underneath as well.

12. Removal: How to Take It Off
Because jelly tints stain the epidermis, they can be stubborn to remove. A standard water-based cleanser often won’t cut it.
Double Cleansing is Mandatory:
1. Oil Cleanser/Balm: Massage a cleansing oil onto dry skin for at least 60 seconds. The oil breaks down the polymers and lifts the pigment from the skin surface.
2. Emulsify: Add water to turn the oil milky, then rinse.
3. Second Cleanse: Follow with your regular face wash.
If a faint stain remains, don’t scrub aggressively. The pigment is harmless and will naturally fade with your skin’s nightly regeneration cycle.

Frequently Asked Questions
Do jelly blush tints work on oily skin?
Yes, jelly tints are excellent for oily skin. Because they are water-based and stain the skin, they don’t slide off like oil-based cream blushes often do.
Can I use jelly blush over powder foundation?
Generally, no. Liquid and jelly textures should be applied before powders. Applying wet jelly over dry powder usually results in caking and separation.
Why does my jelly blush dry so fast?
Jelly tints have a high water and volatile content designed to evaporate quickly to set the stain. This requires you to work one cheek at a time.
Are jelly blushes non-comedogenic?
Most are, as they lack heavy waxes and oils. However, always check the ingredient list for pore-clogging agents if you are acne-prone.
How do I stop jelly blush from staining my fingers?
Use a synthetic brush or a makeup sponge. If you must use fingers, wash them immediately with soap or makeup remover after application.
Is jelly blush the same as benetint?
They are similar in that they are both stains, but jelly blushes have a thicker, gelatinous texture that is easier to control than watery liquids like Benetint.
Can I use jelly blush on my eyelids?
Yes, for a monochromatic look. However, ensure the product is eye-safe, as some red pigments can cause irritation near the eyes.
How long does a jelly blush tube last?
Due to high pigmentation, a little goes a long way. A standard stick can last 6 to 12 months with daily use.
You might also like:- 5 Simple DIY Natural Blush Recipes for Radiant Skin
Discover more from innerspiritglow
Subscribe to get the latest posts sent to your email.
Solid article! Thinking about bankroll management & variance is key in tournaments. Seeing communities like 19slot app casino foster connection is great-a supportive network helps navigate the swings! 👍
Interesting analysis! Seeing a real push for VIP experiences now, like with filbet app casino – security & personalized service are key. Smart move focusing on discerning players! 🤔
Solid article! Thinking about bankroll management is huge in tournaments. Secure platforms like luckymax com also matter – quick, secure deposits (like GCash!) let you stay focused on the game, not payment hassles. Good read!
Interesting breakdown! Analyzing the underlying probabilities is key. For deeper strategy insights, check out agg777 club; it complements the platform’s variety well.
Just found this during a boring meeting and needed a distraction! This platform seems legit for Filipino gamers with slots and live dealers. Check out bigbunny apk download apk to start playing now!