
Key Takeaways
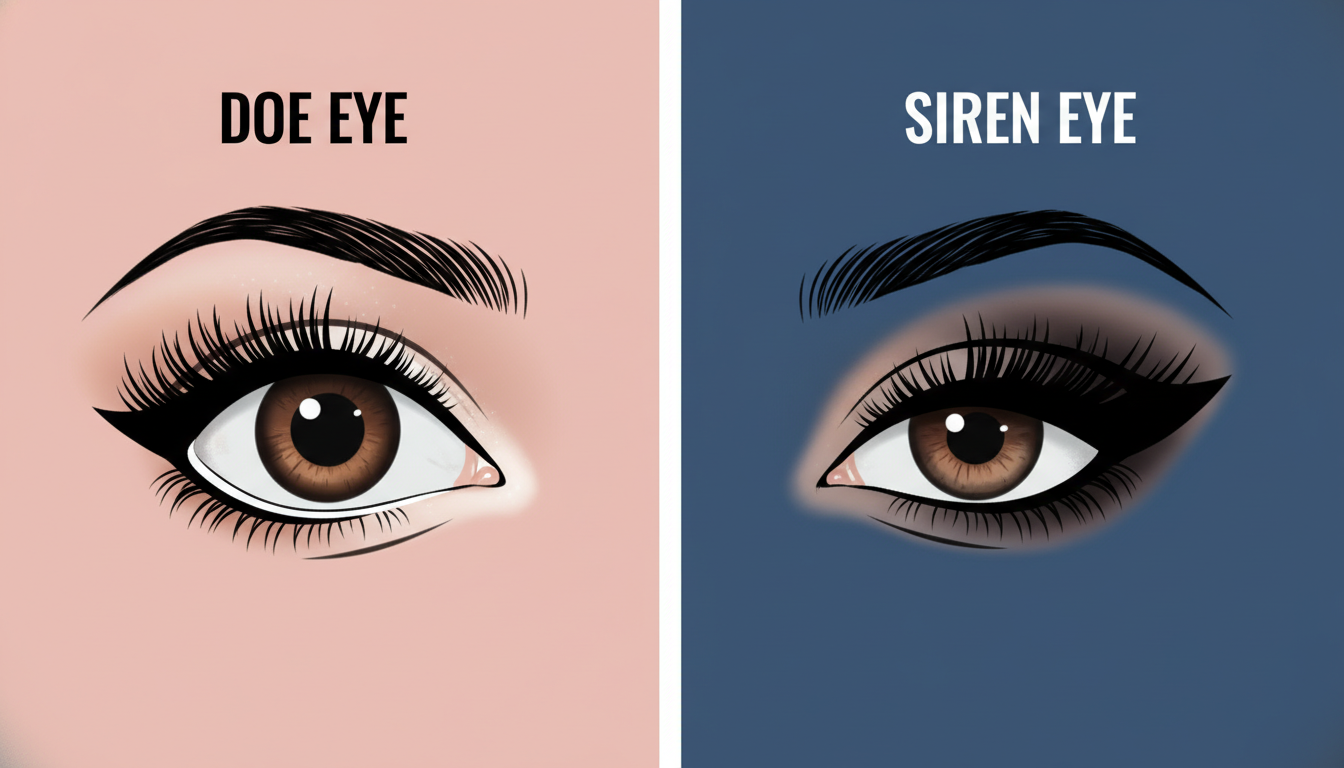
- Visual Difference: Siren eyes elongate and lift the face horizontally, while Doe eyes round and open the eye vertically.
- The ‘Snatched’ Effect: Strategic liner placement mimics the effect of a temporal brow lift without surgery.
- Tool Essentials: A flat angled brush and black eyeshadow are often more critical than liquid liner for the smoky gradient.
- Hooded Eye Modification: The ‘Batwing’ liner shape is required to prevent the fold from hiding the elongation.
- Lash Strategy: Only apply lashes to the outer third of the eye to maintain the cat-like shape.
- Inner Corner: The ‘epicanthic fold’ extension is non-negotiable for the true predatory gaze.
You have seen the look on Bella Hadid, Zendaya, and Alexa Demie: a piercing, elongated gaze that exudes confidence and mystery. It is not just eyeliner; it is an attitude. While the ‘Doe Eye’ trend focuses on innocence and vertical roundness, Siren Eyes are all about horizontal elongation and the ‘Dark Feminine’ aesthetic.
However, achieving this look isn’t as simple as drawing a wing. Many makeup enthusiasts fail because they treat it like a standard cat-eye or ignore their specific eye shape, resulting in a droopy rather than ‘snatched’ appearance. Whether you have hooded, almond, or round eyes, the geometry of the liner changes everything.
In this comprehensive guide, we break down the 12 critical components of the Siren Eye technique. From mapping the inner corner to the specific contouring required to match the lift, here is how to transform your gaze into something unforgettable.
1. The Philosophy: Siren Eyes vs. Doe Eyes
To master the technique, one must first understand the objective. Siren Eyes are designed to mimic a predator’s gaze—narrow, focused, and elongated. The makeup is applied to close the eye slightly to create mystery. In contrast, Doe Eyes aim to mimic a prey animal—round, wide, and innocent, utilizing light waterline colors and center-focused lashes.
Comparison: The Core Differences
| Feature | Siren Eyes (The Hunter) | Doe Eyes (The Prey) |
|---|---|---|
| Shape Goal | Horizontal Elongation | Vertical Roundness |
| Eyeliner | Long, straight, smoked wing | Short, curved, or none |
| Waterline | Black or Dark Brown | White or Beige |
| Lash Focus | Outer Corners Only | Center of the Eye |
| Vibe | Seductive, Mysterious | Cute, Awake, Innocent |
Understanding this dichotomy is crucial because every stroke of your brush for Siren Eyes must fight against vertical roundness. Your goal is to flatten the curve of the eye visually.
2. Essential Toolkit for Precision Work
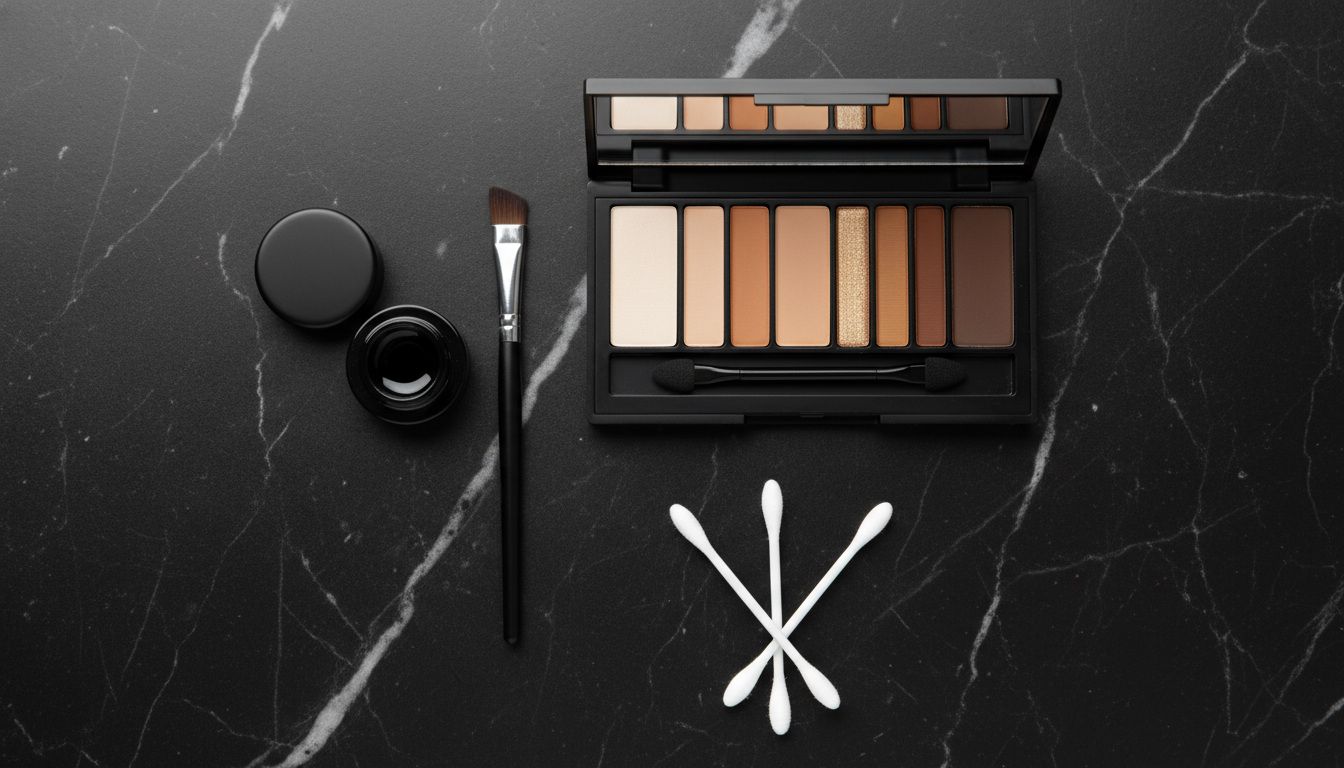
You cannot achieve a smoked, snatched look with a single felt-tip liquid liner. The magic of Siren Eyes lies in the gradient—the fade from pitch black to smoke.
Must-Have Tools:
- Ultra-Thin Angled Brush: For mapping the initial shape with shadow. Look for synthetic bristles that hold their shape.
- Gel Eyeliner (Pot): Provides the intense matte black needed for the waterline and lash line foundation.
- Black & Dark Brown Eyeshadow: Used to smoke out the edges of the gel liner so it doesn’t look harsh.
- Pointed Cotton Swabs: Essential for cleaning up the bottom edge of the wing to ensure it is razor-sharp.
- Concealer: Used as an eraser to carve out the ‘lift’ under the wing.
Pro Tip: Avoid waterproof liquid liners for the initial sketching phase; they dry too fast to smudge effectively.
3. Mapping the Angle: The Temporal Lift
The trajectory of your wing dictates the ‘lift’ of your face. A standard cat-eye often follows the curve of the lower lash line upwards. However, for Siren Eyes, we often take a slightly lower, straighter angle that extends toward the temple rather than the eyebrow tail.
The Mapping Technique:
1. Look straight into a mirror without tilting your head.
2. Imagine a line extending from your lower lash line going straight out, rather than curving up.
3. This straighter line creates the illusion of pulling the eye sideways (elongation) rather than just up.
If the angle is too high, you enter retro/pin-up territory. If the angle is too low, the eyes look sad. The sweet spot is a 15-20 degree lift relative to the horizon of the eye.

4. The Inner Corner Extension (Fox Eye)
The inner corner is arguably more important than the outer wing for this specific look. You are creating a faux epicanthic fold or elongating the existing one.
Execution Steps:
- Sharpen your pencil: Dull tools destroy this step.
Follow the tear duct: Draw a tiny triangle that points down and in* toward the bridge of the nose.
- Connect lightly: Connect this triangle to the upper lash line and the lower water line, but keep the line extremely thin.
This inward point mirrors the outward wing, creating a parallelogram shape that radically changes the eye’s perceived width.

5. Constructing the Outer Wing
Now we build the main structure. Unlike a solid graphic liner, the Siren wing is ‘skeletonized’ or smoked out.
Drafting the Shape:
Start at the outer third of your eyelid. Do not line the entire upper lid; this makes the eye look rounder. Start the line where your pupil ends and extend it outward.
The Gap Technique:
Leave a tiny gap of skin visible between the upper and lower liner at the outer corner before they connect at the tip of the wing. This negative space keeps the makeup from looking heavy and adds to the ‘snatched’ aesthetic. Fill this gap only if you want a very dramatic evening look.

6. The Smudge: Creating the Smoky Gradient
Hard lines can look severe. The Siren look is seductive because it is soft yet sharp.
The Gradient Method:
1. Apply your black gel liner or pencil to define the wing shape.
2. Immediately take your angled brush with dark brown eyeshadow.
3. Buff the top edge of the wing only. Do not smudge the bottom edge; that must remain crisp.
4. Layer black eyeshadow closer to the lash line to deepen the dimension.
This creates a gradient: Skin > Brown Smoke > Black Liner. This softness mimics natural shadows and makes the eyes look deeply set and mysterious.

7. Tightlining and Waterline Strategy
To close the eye horizontally, we must darken the rims. This is the antithesis of the Doe Eye white liner trick.
- Upper Waterline (Tightline): Must be pitch black. This thickens the look of the lashes without taking up lid space.
- Lower Waterline: Line the outer half and the inner corner, but leave the center of the lower waterline bare or lightly shaded.
Connecting the black fully from inner to outer corner can make eyes look small and beady. By leaving the center slightly open, you maintain dimension while ensuring the elongation remains the focus.

8. The ‘Batwing’ Hack for Hooded Eyes
If you have hooded eyes, a straight line will break or disappear when you open your eyes. You need the Batwing Technique.
How to do it:
1. Draw your wing while looking straight forward with eyes open. Draw over the fold.
2. When you close your eye, you will see a ‘notch’ or step in the line.
3. Fill in the liner to connect the notch to the lash line.
The result looks like a strange geometric shape when the eye is closed, but forms a perfect, seamless straight wing when the eye is open. This is essential for maintaining the Siren lift on hooded lids.

9. Lash Application: The Half-Lash Rule
Full strip lashes are the enemy of Siren Eyes. They are usually round and cover the entire lid, hiding your careful liner work.
The Strategy:
- Cut the Strip: Take a pair of wispy lashes and cut them in half. Use only the outer half.
- Placement: Apply this half-lash to the outer corner of your eye, angling the end slightly upward, following your winged liner.
- Mascara: Apply mascara heavily to the outer lashes, pulling them outward. Keep mascara on the inner lashes minimal.
This adds weight only to the outer edge, physically dragging the eye shape outward and upward.

10. Brow Mapping for the Lift
Your eyebrows frame the geometry of the Siren Eye. A highly arched, rounded brow will conflict with the straight, sharp liner.
The Straight Brow Trend:
Shave or pluck the tail of the eyebrow slightly (proceed with caution!) to remove the downward droop. Draw the brow tail straighter and outward toward the temples, parallel to your eyeliner wing. This parallel geometry creates a ‘double lift’ effect that is synonymous with the Bella Hadid aesthetic.

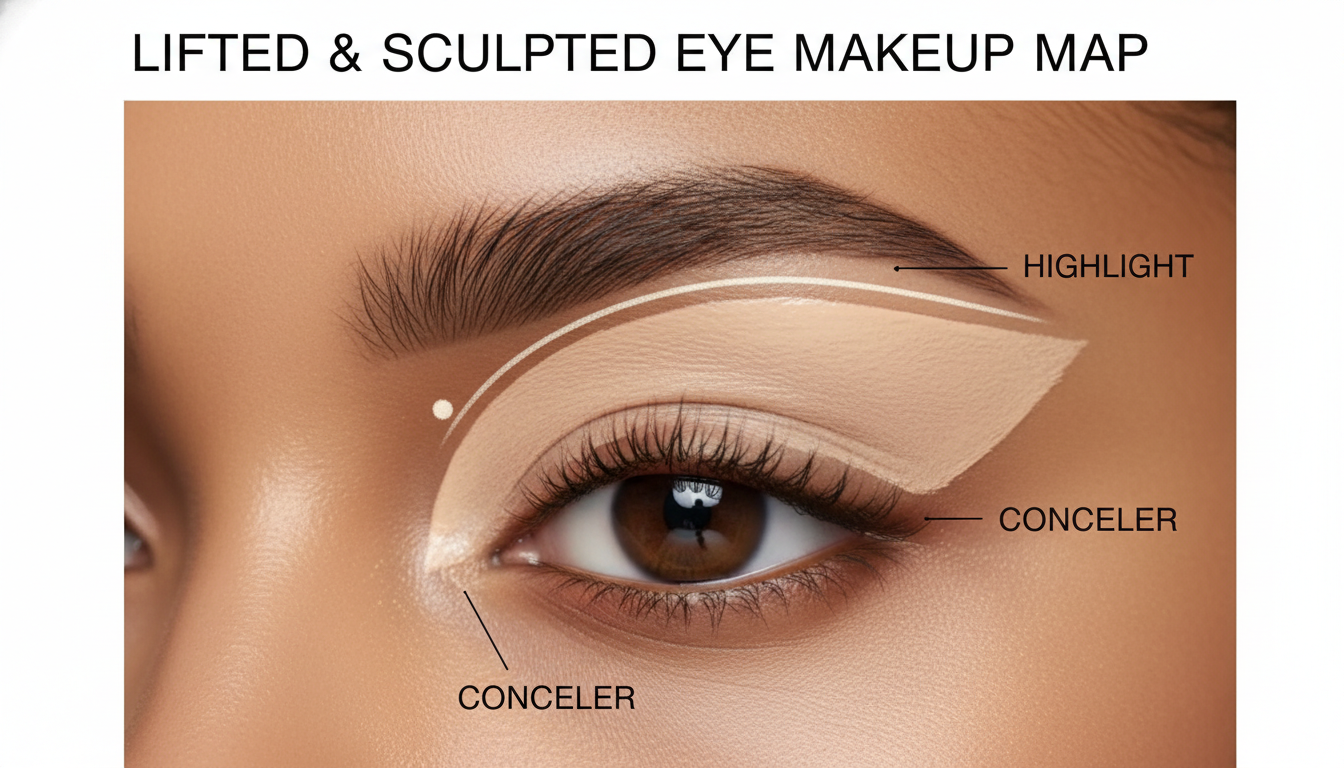
11. Contour and Highlight Integration
Siren Eyes do not exist in a vacuum; the rest of the face must support the lift.
- Concealer Clean-Up: Take a flat brush with concealer and sharpen the bottom edge of your eyeliner wing. Drag this brightness up toward the temple.
- Highlighter: Place a small amount of highlighter on the brow bone, but keep it centered. Do not highlight the outer temple too much, or it may reflect light and blur the sharpness of your liner.
- Temple Contour: Lightly bronze the temples to recede the sides of the face, further emphasizing the eyes pulling outward.
12. Common Mistakes That Ruin the Look
Even with practice, small errors can turn a Siren Eye into a messy smudge.
1. Thick Inner Liner: Making the line too thick on the inner lid makes the eyes look rounder. Keep the inner 2/3rds of the lid almost bare.
2. Droopy Wings: Following the natural eye curve too far down before flicking up. You must leave the lash line early to create the lift.
3. Ignoring Symmetry: Since this look modifies eye shape, asymmetry is very obvious. Step back from the mirror frequently to check balance.
4. Over-blending: Blending the liner so much it becomes a smokey eye. The sharp bottom edge must remain distinct.
Mastering these nuances ensures your look remains sharp, intentional, and dangerously captivating.

Frequently Asked Questions
What eye shape is best for Siren Eyes?
While Almond eyes naturally suit this look, Siren Eyes can be achieved on any eye shape. Hooded eyes require the ‘batwing’ modification, and round eyes benefit the most from the elongation techniques to change their perceived shape.
Can I do Siren Eyes with hooded eyes?
Yes, absolutely. The key is to apply the eyeliner while your eyes are open and looking straight ahead. Use the ‘batwing’ shape (creating a notch in the liner) so the wing doesn’t distort when your eyes are open.
What is the difference between Siren Eyes and Cat Eyes?
A Cat Eye is a classic winged liner that lifts the eye but usually follows the natural curve. Siren Eyes are a specific variation that involves smoking out the liner, extending the inner corner, and using a straighter angle to elongate the eye horizontally rather than just lifting it.
Do I need false lashes for Siren Eyes?
False lashes are recommended but not required. If using them, use ‘half lashes’ or ‘accent lashes’ applied only to the outer corners. Full strip lashes can make the eye look too round and hide the liner work.
What color eyeliner should I use for Siren Eyes?
Black or very dark brown is essential for the sharpest, most dramatic look. However, for a softer daytime version, you can use brown eyeshadow or a soft charcoal pencil.
How do I make my Siren Eyes look sharp?
The secret is clean-up. After applying your liner and shadow, use a flat angled brush with a little bit of concealer to swipe underneath the wing. This creates a razor-sharp line and cleans up any eyeshadow fallout.
Is the Siren Eye trend basically a Fox Eye?
They are very similar and often used interchangeably. The ‘Fox Eye’ usually refers to the surgical trend or the overall face lift look (including brows), while ‘Siren Eyes’ refers specifically to the moody, smoked-out makeup technique.
Can I wear Siren Eyes for a day look?
Yes. To adapt it for daytime, skip the liquid black liner and use a dark brown eyeshadow to create the wing and inner corner. It provides the same elongated shape but with a softer, less intense finish.
Discover more from innerspiritglow
Subscribe to get the latest posts sent to your email.
7777jii aye? Looks like a classic slot site. Old school vibes. Might give it a go if I’m feeling nostalgic which is pretty often, to be honest. Link’s over here: 7777jii
Alright fam, heard abcvip888 offers some pretty sweet VIP perks. I’m all about that high roller life, even if I’m just pretending for the night. Let’s roll: abcvip888
Alright alright, Kubet11net just might be my new go-to. Easy to navigate, and the odds are pretty sweet. Definitely worth a look if you’re into placing some bets! kubet11net