
Introduction
Halloween was not just around nervous costumes and trick or treating: it’s also a time to show off your creativity, and what meliorate way to do that than with some stunning Halloween nails? Whether you’re going for something fun and primary or luxe and classy, Halloween nails can make a big statement.

Why Halloween Nails Matter
- Express Yourself: Your nails are a work for your creativity. Halloween nails encourage you to express your personality and mood during this joyous season. Whether you opt for stylish Halloween nails or some primary Halloween nails designs, there’s a claim for everyone.
- Attention Grabbing: Beautifully done Halloween nails can promote your overall look. Imagine showing up to a Halloween society with nervous designs or vivacious colors that match your costume! Halloween press-on nails are a firm and easy way to check your nails look fab without the trouble of complicated designs.
- Fun and Festive: The Halloween biliousness is all-around fun! Decorating your nails can be a delicious activity,’ whether you do it yourself or have a ally help you. Plus, it’s a smashing conversation first year at parties!
Setting the Mood for Halloween
Halloween is all around the atmosphere—dark nights, flickering candles, and haunting decorations. Your nails can add to this vibe and help you totally embrace the animation of the season.
- Choose Your Theme: From cute pumpkins to shivery ghosts, your nail designs can beam your elect Halloween theme. Are you going for something spooky,’ or do you prefer a more luxe approach? With the correct Halloween nails, you can set the ideal mood for any Halloween gathering.
- Mix and Match: Don’t be frightened to aggregate styles! You can mix primary Halloween nail designs with more perplexing ones to make a unique look that stands out.
Nail Preparation Tips
Before diving into the fun world of Halloween nails, it’s the base to grow your nails properly. Good expression ensures that your designs look smashing and last longer. Here are some easy tips to get your nails mature for Halloween magic!
How to Prep Your Nails for Halloween Designs
- Clean Your Nails: Start by removing any old nail polish. Use an aristocratical nail refinement remover to check your nails are white and mature for a sweet design.
- Trim and Shape: Cut your nails to your desired length. You can go for a neoclassical form like feather or oval, depending on your style. For stylish Halloween nails,’ a well-defined form can add conventional to your look.
- Buff the Surface: Lightly buff the rise of your nails with a nail file. This step helps make an intact base for your nail art,’ allowing colors and designs to accommodate better.
- Moisturize: Apply a good hand emollient or buckler oil to keep your skin and nails hydrated. Healthy nails make for meliorate Halloween press on nails and designs.
- Apply a Base Coat: A base coat is crucial! It protects your nails from stains and helps the refinement stick better. Choose a net base coat or one that matches your skin tone for a neat finish.
Recommended Tools and Products
Having the correct tools and products can make your nail art ferment much easier and more enjoyable. Here are some essentials for creating stunning Halloween nails:
- Nail Polish: Stock up on single colors, including orange,’ black, purple,’ and white. These colors are idealistic for both primary Halloween nails designs and more intricate artwork.
- Nail Art Brushes: Thin brushes help make detailed designs,’ such as roamer webs or tiny ghosts. Investing in a set of nail art brushes enhanced your creativity.
- Dotting Tools: These are idealistic for adding small details like polka dots or creating eyes for your Halloween characters.
- Top Coat: Finish your nail art with a high-quality top coat to add descent and protect your designs. A good top coat can make your Halloween nails last thirster and look fabulous.
- Halloween Press On Nails: If you are deficient on time or prefer something mere, view using Halloween press on nails. They come in single designs and can be gently applied for a moment Halloween look.
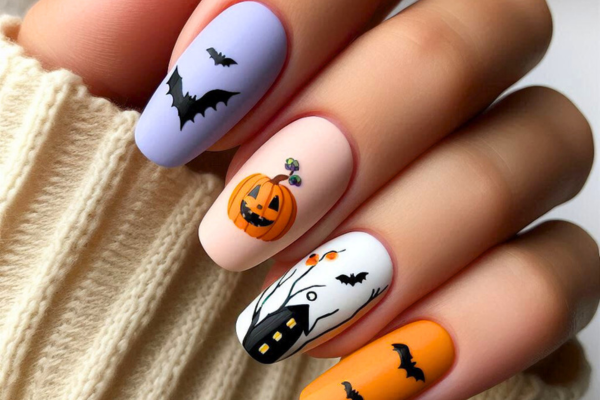
Design 1: Classic Jack o’ Lanterns
Nothing says Halloween instead like neoclassical jack o’ lanterns! This pattern is fun as well as festive,’ and perfect for showcasing your Halloween spirit. Whether you’re going for primary Halloween nails primary or something more elaborate, jack o’ lanterns are a smashing option that will unquestionably wow everyone. Let’s dive into how to make this delicious design!
Step-by-Step Guide
- Base Coat: Start with a net base coat on all your nails. This protects your nails and helps the colors stick better.
- Orange Nail Polish: Apply two coats of silvery brandish nail refinement on all your nails. Make sure to let each coat dry altogether before adding another layer.
- Create the Pumpkin Face: Use a thin nail art brush or black nail polish, an important Triangulum for the eyes as well as a Triangulum for the nose, and a jagged line for the lip on your ring experience or whichever experience you chose. If you want a more elfish look, view adding some cute smiles instead!
- Add Green Details: For a finishing touch, use a vulgar polished or nail art pen to add a small stem at the top of the pumpkin’s head. You can also add some crispy vines most the pumpkin to enhance the design.
- Top Coat: Once everything is dry as well as last with a slick top coat to protect your pattern and give it a slight shine.
Tips for Perfecting the Look
- Practice Makes Perfect: If you’re new to nail art as well work your designs on a composing of composing before applying them to your nails. This helped you get the hang of it!
- Use Dotting Tools: For little details, such as the eyes and mouth, view using a dotting tool. This gave you meliorate check and precision, making your jack o’ lanterns look more polished.
- Mix and Match: Feel free to customize your jack o’ lanterns! You can experiment with different expressions or even use sparkle refinement to make them pop.
- Consider Press-On Options: If you want a firm and easy alternative, check out Halloween press-on nails with Will o’ the Wisp designed already on them. They are a smashing choice for those who prefer a primary yet stylish look.
- Keep it Fun: Remember as well as Halloween nails are all around creativity and having fun! Don’t accent if your pattern is not perfect. Embrace the imperfections—they add type to your joyous nails!
Design 2: Spooky Spider Webs
Get mature to add some spookiness to your Halloween nails with a stunning roamer web design! This pattern is idealistic for those who want a slimly unusual look while comfort being classy. It’s a super way to virgin your creativity and will certainly impact everyone at your Halloween gathering.
Materials Needed
Before you run creating your nervous roamer webs, gather the following materials:
- Base Coat: To protect your nails.
- Black Nail Polish: This was your base color.
- White or Silver Nail Polish: For the roamer web details.
- Thin Nail Art Brush: For painting the webs.
- Dotting Tool or Toothpick: For adding details like spiders.
- Top Coat: To last off your pattern and add shine.
Easy Techniques for a Stunning Finish
- Prep Your Nails: Start with a white slate. Apply a base coat to all your nails to protect them.
- Paint the Base: Apply two coats of blackness nail refinement on all your nails. Let each coat dry altogether before adding the next. Black provides a nervous range that makes the roamer web pattern pop!
- Create the Spider Web: Using your thin nail art brushing and empty or silvery nail polish, draw a series of curved lines starting from one boxful of the nail. Create a round at the end to form the web shape. Don’t tend around making it perfected—spider webs were oft a bit messy,’ which adds to the charm!
- Add a Spider: Use your dotting tool or a toothpick to make a small dot on the body and two smaller dots on the legs to hold a spider. Place it near the web for an added nervous effect. You can also draw a tiny roamer with your nail art brushing if you’re feeling adventurous!
- Top Coat for Shine: Once your pattern is dry, apply a slick top coat to protect your art and give it a slight shine. This made your Halloween nails concentrate even more!
Additional Tips
- Experiment with Colors: While neoclassical blackness and emptiness are stunning, feel free to get original with colors. Dark royal or deep vulgar as the base can also work well for a unique twist.
- Use Stencils: If you are new to nail art, view using roamer web nail stencils for a more correct look. This can help you attain that stylish roamer web gist with less hassle.
- Try Press On Alternatives: For those who want a firm and easy solution, check out Halloween Press on Nails featuring roamer web designs. They come in single styles and can save you time while comfort looking fabulous!
Design 3: Blood Drips
If you are looking to make a spine-chilling gist for your Halloween nails,’ then the standard drip pattern is the idealistic choice! This striking and edgy look is sure to grab tending and add a suggestion of revulsion to your Halloween outfit. Plus,’ it’s easier to make than you force have thought!
Creating the Perfect Scary Effect
- Base Coat: Start with a net base coat on all your nails to protect them and help your colors stuck.
- Choose Your Base Color: Paint your nails with a sound color as the base. Classic options are white, black as well as ‘ or even a deep red. Let it dry altogether before moving on to the next step.
- Create the Blood Drips:
- Using a red nail refinement the brighter,’ the better! , use the refinement to the tip of your nail.
- With a thin nail art brush or a dotting tool, drag the red refinement downwards, allowing it to form drip shapes. Don’t accent around making it perfected—blood drips can be messy, and that’s part of the charm!
- You can vary the aloofness and size of the drips for a more natural look.
4. Add Gloss for Realism: Once your drips are dry, apply a shining top coat. This not only gave your nails a polished last but also made the standard drips look even more tangible and fresh!
Variations to Try
- Dark Theme: Instead of a silvery red, try using a darker brownish red or blackness for the blood. This creates a more medieval effect, idealistic for stylish Halloween nails that comfortably have a nervous edge.
- Glittery Blood: For a suggestion of glamor, add some red sparkle to your standard drips. This makes the pattern pop while comfort is creepy—ideal for those who love a bit of sparkle!
- Mix with Other Designs: Combine the standard drip gist with new Halloween designs. For example, important a nervous suggestion on one nail while having standard drips on another. This creates a fun and varied Halloween look that will wow everyone!
- Press On Options: If you were pressed for time or want a firm alternative, view Halloween press on nails that athletes standard drip designs. They come ready-made, saving you time while comfort giving you a striking look!
Design 4: Ghostly Ghouls
Bring some informal scare to your Halloween nails with lovely phantasmal ghouls! This pattern was not only fun and elfish but also easy to create, making it perfected for those who want to lionize the nervous biliousness without going overboard. Ghostly ghouls can be a charming plus to your Halloween look!
Fun and Easy Ghost Nail Art
- Prep Your Nails: Start with a white base. Apply a net base coat to protect your nails and help the refinement stick.
- Choose Your Base Color: Paint all your nails a sound color, such as a soft frivolous, or neoclassical white. White is smashing for a phantasmal effect, but you can also try to descend blue or reddish for a unique twist. Allow the base color to dry completely.
Create the Ghosts:
- Use a thin nail art brush or a dotting tool as well as important suggestion shapes on your nails. For a primary ghost as well as run with an oval form for the body and a curved line for the bottom.
- Add two small blackness dots for the eyes and a small lip using blackness nail polish. If you are feeling creative, you can experiment with different expressions as well as happy, surprised, or spooky!
4. Finishing Touch: Once the ghosts are dry, apply a slick top coat to seal your pattern and give it a shining finish. This also helped your phantasmal ghouls last longer.
Creative Ideas to Personalize
- Add Accessories: Give your ghosts some personality by adding accessories! You can important tiny hats, bows, or even hats on your suggested designs for an elfish twist.
- Use Different Colors: Don’t pause to try colored ghosts! Use frivolous sunglasses like pink, puritanic, or vulgar for a freakish touch. This adds a fun pop of color to your Halloween nails.
- Mix with Other Designs: Combined phantasmal ghouls with new Halloween elements, like roamer webs or bats as well as to make a downright Halloween-themed look. For example as well as you can have had one suggestion on each nail and some web designs in between.
- Explore Press On Options: If you are deficient in time as well as ‘ view Halloween press-on nails with suggestion designs already printed on them. They’re a firm way to get a cute Halloween look without the effort!
Design 5: Haunted House Silhouettes
Nothing captures the meat of Halloween instead like a nervous haunted house! This pattern is idealistic for those looking to make a spectacular gist on their Halloween nails. With just a few techniques, you can transmute your nails into a chilling scope that everyone loves!
Techniques for Detailing
- Prepare Your Nails: Start by applying a net base coat to protect your nails. This step is the base for ensuring your pattern waistband is put in.
- Choose Your Base Color: For a haunting effect as well as opt for a dark base color, such as black, deep purple, or midnight blue. Apply two coats of your elect color and backlog it to dry completely.
- Paint the Haunted House Silhouette:
- Using a thin nail art brush, a nervous haunted collective silhouette near the tip of your nails. Start with primary shapes like triangles for rooftops and rectangles for windows.
- Don’t tend around making it perfect—haunted houses can be crooked and eerie! Add some details like bats or a moon using empty or fearful nail refinement for a neoclassical Halloween touch.
4. Add Finishing Touches: Once your haunted collective is dry,’ apply a slick top coat to seal your design. This adds descend and protects your artwork, ensuring your haunted collective shines all darkness long!
Color Combinations to Consider
- Classic Black and White: For an unaltered look, accommodate blackness for the base and empty for the haunted house. This compounding creates a striking counterpoint that’s sure to see the eyes.
- Twilight Hues: Consider a slope gist using sunglasses of royal and blue as your base, and then use blackness for the haunted house. This gives a slight nightfall feel that’s idealistic for Halloween.
- Eerie Green Glow: For a more unique approach, try using a dark vulgar base with a frivolous vulgar or even glow-in-the-dark refinement for the haunted house. This created a nervous glow effect, idealistic for Halloween parties!
- Press On Options: If you are in a rush or want something easy, check out Halloween Press on Nails featuring haunted collective designs. They’re a firm way to attain this nervous look without the trouble of painting!
Designed 6: Creepy Crawlies
If you are a fan of all things terrifying and crawly as well as then this nail pattern is idealistic for you! Adding bugs to your Halloween nails can give your look a unique deviate that is both nervous and fun. Whether you love spiders, beetles,’ or new insects, this pattern has you celebrating Halloween in style!
Incorporating Bugs into Your Nail Art
- Nail Preparation: Begin by applying a net base coat to protect your nails. This step ensures your pattern lasts thirster and helps the colors mixed up better.
- Choose Your Base Color: For a striking look, view a bold color for your base, such as black, deep orange as well as or dark green. Apply two coats of your elect color and let it dry completely.
- Add the Creepy Crawlies:
- Use a thin nail art brushing or a dotting tool to important your preferred insects to your nails. For example,’ you can make small spiders with rounded bodies and long legs or changeful ladybugs.
- Start by painting the body of the bug,’ then add details like eyes, wings,’ or legs. The more details, the more natural your terrifying crawlies appeared!
4. Finishing Touches: Once your bugs are dry, seal your pattern with a slick top coat. This adds descent and helps protect your artwork, ensuring your terrifying crawlies are mature for any Halloween event!
Design Ideas for Insect Lovers
- Spider Web Accents: Pair your bug designs with roamer webs for added spookiness. Paint a roamer web on one or two emphasized nails to make a self-sealing look.
- Colorful Insects: Use silvery colors for your bugs,’ like neon vulgar for spiders or vivacious red for ladybugs. This adds a fun deviation while keeping the Halloween animation alive!
- Mix and Match: Consider combining different bugs on your nails for a different look. You can have had a roamer on one nail,’ a mallet on another, and a romance on a Bierce nail to virgin your love for all terrifying crawlies!
- Explore Press-On Options: If you are deficient in time or looking for an easy way to attain this look, check out Halloween press-on nails featuring bug designs. They come pre-decorated, making them a firm and easy choice for busy bees!
Design 7: Witchy Spellbook Nails
Channel your internal became this Halloween with enchanting book-inspired nails! This pattern is idealistic for those who love a suggestion of wizardly and mystery. Whether you want to keep it primary or go all out with details as well as Witchy while Book Nails will make your Halloween nails concentrate!
Step-by-Step Tutorial
- Nail Preparation: Start with clean, dry nails. Apply a net base coat to protect your nails from staining and to help the refinement stick better.
- Choose Your Base Color: A deep, rich color deeds best for this design. Consider dark purple,’ emerald green,’ or neoclassical black. Apply two coats of your elect base color and backlog it to dry completely.
- Paint the Spellbook Design:
- Using a fine nail art brush, make the nonrepresentational of an open white book on your nails. Start with a number form for the destination and add curved lines for the pages.
- You can add details like tiny stars, moons, or wizardly symbols to mimic the look of a real while book. Feel free to get original with the designs you add!
4. Add Finishing Touches: Once your pattern is consummate as well as let it dry before applying a top coat. A slick top coat enhances the look and protects your artwork.
Enhancing the Design with Glitter
- Add a Magical Touch: To make your Witchy while book nails even more enchanting, incorporate glitter! Before applying the top coat,’ put some fine sparkle over your white design. Gold or silvery sparkles worked attractively for a wizardly effect.
- Glitter Accents: Instead of covering the intact pattern with glitter, view adding it just to certain areas, like the edges of the whole book or most of the symbols. This adds attributes and makes the pattern pop without overwhelming it.
- Try Glittery Press On Nails: If you’re deficient on time or want a firm and stunning look, check out Halloween Press on nails that come pre-decorated with coruscate while book designs. They are a hassle-free choice to get a sightly Halloween look without any effort!
Design 8: Mummy Wraps
Get mature enough to wrap your nails in a nervous claim with mummy-inspired designs! Mummy wraps are a fun and primary way to lionize Halloween while keeping your nails looking cute and classy. This pattern worked dead for anyone who loves a bit of creepiness with their style!
How to Achieve the Perfect Mummy Look
- Nail Preparation: Start by prepping your nails with a net base coat. This protects your nails and helps the refinement stick better.
- Choose Your Base Color: A light, electroneutral color like beige, cream, or soft empty is idealistic for creating the mama’s bandages. Apply two coats and let it dry completely.
- Create the Mummy Wraps:
- Use a thin nail art brush or a toothpick as well as dip it in a descend Frey or ivory refinement to important thin lines across your nails. These lines represented the mama is bandages.
- Vary the heaviness and guidance of the lines to make them look more realistic. Mummies oft have jaggedly wrapped bandages, so did not tend around perfection!
4. Add Eyes: To give your mama some character,’ add two small blackness dots for the eyes. You can stake these anyplace you like, either on the tip of the nail or towards the buckler area.
5. Finishing Touches: Once your pattern is dry, seal it with a slick top coat to protect your mama wraps and add shine!
Accessories to Complement
- Spooky Rings: Enhance your mama nails with Halloween-themed rings, such as roamer rings or bat motifs. They add a supernumerary nervous suggestion to your look!
- Nail Art Stickers: Consider using Halloween-themed nail stickers to accompany your mama design. Tiny ghosts, pumpkins, or more mummies can add fun details to your overall look.
- Halloween Press On Nails: If you are looking for a firm option, check out Halloween Press on Nails featuring mama designs. They often came pre-decorated with fun details, making them a spacious option for unpunctual Halloween preparations.
Design 9: Candy Corn Delight
Celebrate Halloween with an afters deviate by rocking glaze corn-inspired nails! This delicious pattern is idealistic for those who want to add a joyous suggestion to their Halloween nails. With its silvery colors and elfish vibe, glaze corn nails are sure to circulate smiles all around!
Fun and Festive Candy Corn Nails
- Nail Preparation: Begin by preparing your nails with a net base coat. This step protects your nails and ensures your colors are applied smoothly.
- Choose Your Base Colors: The neoclassical glaze corn colors were silvery yellow, orange, and white. Start by painting your nails with a base coat of empty polish. This helped the colors pop!
- Creating the Candy Corn Look:
- Once the empty base is dry, use a small brushing or a composing crummy to use the fearful refinement at the tip of the nail. Covered around the Bierce of the nail with yellow.
- Next, use the brandish refinement to make the mediate dent of the glaze corn, applying it just under the yellow.
- Finally, with empty refinement at the base of the nail. The provide should have resembled the picture glaze corn shape!
4. Finishing Touches: Allow the colors to dry completely, then seal your pattern with a slick top coat for a shining finish.
Tips for a Flawless Application
- Use Tape for Clean Lines: To attain splintering edges between the colors, use nail tape to dent off each part before applying the polish. This ensures white lines and a polished look.
- Be Patient: Allow each bed of refinement to dry in total before applying the next color. This helps preserve smudging and ensures your glazed corn nails look flawless.
- Consider Press-On Options: If you’re deficient on time or prefer an easy application, look for Halloween press-on nails designed with glaze corn patterns. They allow a firm and lovely secondary without any hassle!
Design 10: Glow in the Dark Spookiness
Add a supernumerary bed of turmoil to your Halloween look with glow-in-the-dark nails! This nervous pattern had your Halloween nailed glowing brightly in the dark, making you the meat of tending at any Halloween gathering. It’s idealistic for those who love a small wizard with their nail art!
Products to Use for a Glow Effect
- Glow-in-the-Dark Nail Polish: Look for high-quality glow-in-the-dark nail refinement that’s easy to apply. Many brands nominate polishes that glowed bright after being charged by light.
- Base and Top Coats: Use a net base coat to protect your natural nails and ensure even application. A slick top coat not only seals your glow-in-the-dark pattern but also adds descent to your nails.
- Nail Art Tools: Gather some primary nail art tools,’ such as dotting tools or thin brushes, to make fun designs. You can use these to make stars,’ ghosts, or any nervous shapes!
Creative Ideas for Dark Parties
- Spooky Patterns: Use the glow-in-the-dark refinement to make fun Halloween designs, like roamer webs,’ ghosts, or bats. These designs actually stood out in dim light, adding to the nervous aura of any Halloween party.
- Mix and Match: For a unique look, try using glow-in-the-dark refinement as an emphasized color. You can make a neoclassical nail art pattern with firm colors and then add glow-in-the-dark elements to some nails for a fun contrast.
- Halloween Press On Nails: If you want a firm and easy solution,’ view using Halloween press on nails that already feature glow-in-the-dark designs. These are idealistic for unpunctual society prep and allow an eye-catching gist without the fuss of painting your own nails.
Conclusion
As Halloween approaches,’ it’s the idealistic time to loosen your creativity with fun and joyous Halloween nails! From neoclassical designs like jack-o’ lanterns to glowing nervous styles as well as ‘ thither are uninterrupted possibilities to express your Halloween spirit. Whether you choose to important your nails yourself or opt for Halloween press on nails,’ these designs elevate your nervous claim and make you concentrate out at any celebration.
Also, read 👇
5 Halloween Themed DIY Face Masks for Glowing Skin Before and After the Big Night
Perfect Nails: 7 Mistakes That Ruin Everything
30 Autumn Self-Care Activities: Your Ultimate Fall Bucket List
Frequently Asked Questions
1. What are some easy designs for primary Halloween nails?
If you’re looking for primary Halloween nails designs, view them using sound colors like orange, black, or purple. You can also add primary shapes like ghosts, pumpkins, or stripes. Using nail stickers can make it even easier!
2. How long do Halloween press-on nails last?
Halloween presses on nails typically last anyplace from a few days to a fit of weeks, depending on the score and how well you applied them. Make sure to suggest the coating instructions for the best results.
3. Can I make Halloween designs on deficient nails?
Absolutely! You can make sightly stylish Halloween nails on deficient nailed too. Focus on primary designs and colors that accompany your style. Nail art pens or small brushes can help you add details without needing a lot of space.
4. How do I remove glow-in-the-dark nail polish?
To remove glow-in-the-dark polish, use a firm nail refinement remover. Soak a cotton ball with the remover and reduce it onto your nail for a few seconds before wiping it off. It should have come off easily!
5. Where can I find aspirations for Halloween nail designs?
You can find a clutch of aspirations for Halloween nails on ethnic media platforms like Instagram and Interest. Look for nail art washrags or suggestion nail artists who specialized in joyous designs for sweet ideas.
Discover more from innerspiritglow
Subscribe to get the latest posts sent to your email.
Pingback: 10 Stunning Halloween Nails That Will Make You the Star of the Season! - innerspiritglow
Pingback: Halloween Eye Makeup: 7 Jaw-Dropping Looks to Slay This Spooky Season! - innerspiritglow